
Copy To
Overview
Copy To is a comprehensive tool for duplicating assemblies and their components in Inventor, providing advanced options for folder structure, file naming, prefix management, and static file handling. This command is ideal for scenarios where you need to create a new version of an assembly, migrate components to a new project folder, or replicate complex assemblies with nested components. Copy To allows you to select a source component or file, choose a destination folder, and configure how nested files, static files, and references are handled. You can control file indexing, prefix replacement, and even perform search-and-replace operations on folder and file names during the copy process. The command ensures that all copied files are uniquely indexed to prevent overwriting, and provides detailed logging for files that are not copied due to static status or location constraints. Copy To streamlines the process of duplicating large assemblies, supports batch operations, and helps maintain organized, non-redundant project structures. It is especially useful for managing design variants, creating new job folders, or sharing common components across multiple assemblies without unnecessary duplication.
Dialog Box Input
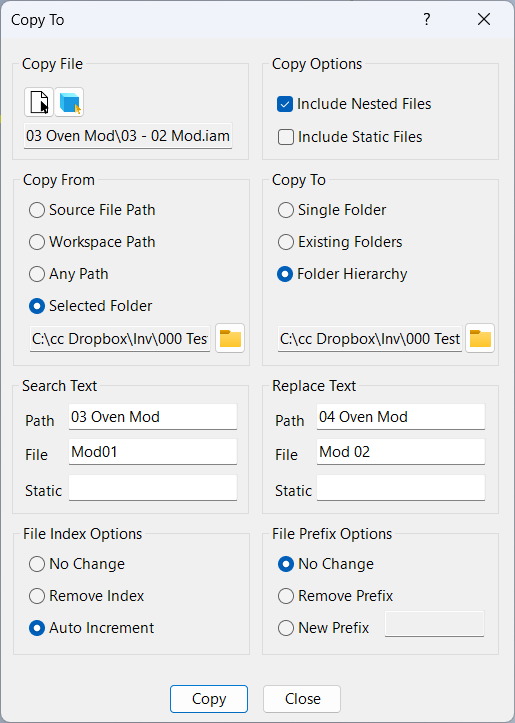
Copy File
File to copy, may be any type of Inventor file including drawings. Select the File button to find a file to copy or the Component button to select a component in the existing assembly.
When you click the Copy button, you are presented with a list of files that are to be copied and a list of files that will not be copied (static or files not located in the Copy From folder). In this dialog, you have the option to proceed with the copy or you can cancel so you can adjust the parameters.
Copy Options
Check Include Nested Files to copy the source file along with all referenced nested files. Leave this unchecked to copy only the source file and leave all existing references pointing to the original files.
Check Include Static Files to include static files in the copy. The behavior of this depends on the location of the static file:
Workspace Path: This option is ignored. The purpose of a static file is to prevent creating multiple copies of the same file. Therefore static files that are located in the workspace path are never copied and all references remain pointing to the original static file.
Other Workspace: This option is ignored. Since we never want to reference files in other workspace's, static files located in another workspace are always copied to this workspace regardless of this setting.
Library Path: If Include Static Files is checked, static files located in a library path (except Template paths) are copied to a new "static" sub folder within the project workspace using the existing file hierarchy path. Otherwise, the existing references remain and they are not copied.
Template Path: If Include Static Files is checked, static files in Template folders are copied to a new "static" sub folder within the project workspace using the existing file hierarchy path. Otherwise, the existing references remain and they are not copied.
Copy From
This is where you determine what files are copied to the new folder. If a referenced file is not located within the chosen folder path, it is not copied and all references remain pointing to the original file. When copying from another project workspace, this should be the root folder for the project to ensure all files are copied. If any files are not copied, they are logged in the iLogic log window.
Source File Path
Select this option to copy only files that are located within the path of the source file or sub folders.
Workspace Path
Select this option to copy only files that are located within the Workspace path.
Any Path
Select this option to copy files from anywhere, regardless of their location. May be in anywhere in this workspace, or another workspace.
Selected Folder
Select this option (and select a folder using the "Folder" button) to copy only files that are located within this path.
Copy To
These settings determine where the copied files are to be placed.
Single Folder
Select this option to copy all files to a single folder as defined by the "Copy To" folder.
Existing Folder
Select this option to copy all files into their existing folders. Selecting this option will force all files to indexed (to prevent overwriting), unless you provide a new or revised prefix.
Folder Hierarchy
Select this option to copy all files along with their existing folder structure into the "Copy To" folder.
Search Text / Replace Text
In this section you can replace text in folder structure, file names, and static file names with new text as they are copied. Each search replace item can be a single text entry or a list of text entries separated by commas. If search is empty, no search replace is done. If replace is empty, all search strings are replaced with an empty string.
If a search list is provided, the replacement list may be either a single entry (replace all search entries with this replacement entry) or a list containing exactly the same number of entries in the search. Each item in the replacement entry may be empty. In the example below, Oven 1 is replaced with Oven 2, OV1 followed by a space is removed, O1 is replaced with O2.
Search: Oven 1, OV1 , O1
Replace: Oven2,, O2
Search Path Text
When Folder Hierarchy is selected, search sub folders (path sub folders beyond the Copy From path) for matching text and replace with replacement text in new sub folders. Does not replace text in Copy From path, only sub folders of Copy From path.
May be a single search item or a list of items separated by commas.
If search contains more than one item, replace must contain one item (replace all search) or a list containing the same number of items as search.
Each replace item may be blank, meaning remove the search item.
Search File Text
Search the source file name and replace search text with replacement text in the new file. This can usually be left blank and instead the New Prefix text is used to replace text.
Search Static Text
Search the source file name on static files and replace search text with replacement text in the new file. This is separate from Search file text because static files typically do not have prefix text and sometimes have a job prefix as opposed to a job and item prefix. Search/Replace on static files only applies to static files copied from other project folders.
Replace Path Text
Search the source file path and replace search text with replacement text in the new file.
Replace File Text
Search the source file name and replace search text with replacement text in the new file. This can usually be left blank and instead the New Prefix text is used to replace text.
Replace Static Text
Search the source file name on static files and replace search text with replacement text in the new file. This is separate from Search file text because static files typically do not have prefix text and sometimes have a job prefix as opposed to a job and item prefix. Search/Replace on static files only applies to static files copied from other project folders.
File Index Options
These options determine how to handle the file indexing: No Change copies the source file to the destination leaving the index as is; Remove Index removes the file index, and Auto Increment adds a new index as needed to ensure the file is unique. If Auto Increment is off and the destination file already exists, the file is incremented. Also, if the source file does not have an index, Auto Increment is ignored and the new file will also not have an index.
File Prefix Options
These options determine how to handle the file prefix: No Change copies the source file to the destination leaving the prefix as is; Remove Prefix removes the file prefix, and New Prefix adds the new prefix to the new files. The prefix text applies to non static files only.
CopyTo Example
In this example we want to duplicate an oven; Copy a Basecoat oven to a Prime Oven. We want to copy the oven shell, internal ductwork, and external ductwork, but do not want to duplicate oven heaters and other common items. To do this, we would keep the common items in a separate folder from the BC and PR ovens.
Source File
c:\jobs\Job Name\Ovens\BC Oven\Mods\XX-OV-BC - Oven Mods.iam
Copy From Folder
c:\jobs\Job Name\Ovens\BC Oven\
Copy To Folder
c:\jobs\Job Name\Ovens\PR Oven\
File Index
Auto Increment
New Prefix
XX-OV-PR
Below is an example folder structure for the BC Oven and the new copied folder structure for the PR Oven. Note that when CopyTo is run with the input indicated above, the entire folder structure of the 'BC Oven' is duplicated to the PR Oven. Also notice that since the 'Common Oven' folders are not within the Copy From folders, those files will remain and not be duplicated. Finally, note the oven type is not within the base file name, we place all oven types in the prefix so the prefix can be renamed when we run CopyTo.
c:\jobs\Job Name\
Ovens\
Common Oven\
Heaters\
Components\
Lifting Lugs\
BC Oven\
Mod Common\
Mods\
XX-OV-BC - Oven Mods.iam
Shells\
Internal Ductwork\
Ductwork\
Recirculation\
Fresh Air\
Exhaust\
Air Seal\
PR Oven\
Mod Common\
Mods\
XX-OV-PC - Oven Mods.iam
Shells\
Internal Ductwork\
Ductwork\
Recirculation\
Fresh Air\
Exhaust\
Air Seal\
All referenced files that are located in the Source Root “c:\jobs\Job Name\Ovens\BC Oven\” or one of its sub folders are copied to the Destination Root “c:\jobs\Job Name\Ovens\PR Oven\”. This might include common components that are used in several of the oven modules, but not necessarily a component that is identical on other ovens. For example, “c:\jobs\Job Name\Ovens\BC Oven\Mod Common\” might contain air seal components used on the BC oven that need to be revised for the PR oven. In this case, these components are copied to the PR oven and can be updated without effecting the original source files.
All files that are not located within this Copy From path are not copied and instead the reference remains. This is what you want for example if you have common components that are shared among both ovens and you do not want duplicates. These components could be placed in a folder “…Job Name\Ovens\Common Oven\...” In this case, these files will be shared among both ovens.